Basically, all of the links on this page are affiliate links. I receive a commission (at no extra cost to you) if you make a purchase after clicking one of the affiliate links below. Read our Affiliate Link Policy for more information.
Once upon a time, analog video was the only way to fly FPV. It was low resolution and had breakup and static, just like old broadcast TV. At least it was inexpensive. But lots of people wondered: why can’t we have digital HD systems for FPV like we do for everything else? Today, we can. All of the video systems on this page transmit at least 720p resolution with digital signals, so you can finally enjoy FPV with an image quality that looks like something out of this century!
This page is divided into the three “families” of digital FPV system: DJI, Walksnail, and HDZero. Each section has goggles and display devices, video transmittrs and cameras, and accessories. The goggles go on your face. The video transmitter and camera go on the drone.
Although this isn’t the place to do a deep dive on which video system to select, here are some bullet points to help you make up your mind, if you are still on the fence:
Analog Key Facts
- Analog video transmitters and cameras are about 1/2 to 1/4 the price of digital.
- Analog is good for racing because of its low and constant latency.
- Analog is best for long-range (over approx. 20 km).
- Analog is best for ultra-small drones like 65mm Whoops because it can be small and light. But digital systems come close.
- Analog image quality is very poor. Low resolution like TV from the 80’s.
- Analog image can be unstable when signal is weak or the environment has interference. Image goes black-and-white, rolls, smears, and gets staticky.
- Low-light analog cameras are widely available.
- Analog systems are made by many different companies, so price, quality, performance, and after-sale support can vary.
DJI Key Facts
- DJI has the best image detail and resolution.
- DJI video transmitters and cameras are the most expensive.
- DJI has the best penetration in indoor environments.
- DJI has excellent range in open environments, but once the usable range is reached, it can’t easily be “hacked” to increase range.
- DJI has higher latency than analog and HDZero, and variable latency. This makes it less ideal for racing and fast, proximity freestyle.
- DJI systems typically have a supported lifespan of 4-6 years. Some refer to this as “planned obsolescence”.
- DJI systems are extremely polished and easy to use.
- DJI is less responsive to community feature requests and bug reports.
- DJI after-salfe support is, for the most part, very good. However if you are out of warranty, repairs can be expensive. And self-servicing DJI equipment is sometimes impossible.
- Low-light performance of the DJI system is mediocre.
- The DIJ O4 system can record 4k video on-board. Camera image quality is believed by many to be good enough to replace a GoPro.
- The DJI O4 Lite video transmitter is small and light enough for 75mm to 85mm drones or larger. It’s not ideal for 65mm Whoop style drones.
Walksnail Key Facts
- Walksnail has 2nd best image detail and resolution.
- Walksnail video transmitters and cameras are less expensive than DJI and about the same price as HDZero.
- Walksnail has good penetration in indoor environments, but DJI still wins.
- Walksnail is moderately “hackable” for increased range, since the goggles support aftermarket antennas. There is also a high-powered 2 Watt video transmitter.
- Walksnail has higher latency than analog and HDZero, and variable latency. This makes it less ideal for racing and fast, proximity freestyle.
- All Walksnail video transmitters released to date are compatible with all Walksnail goggles released to date.
- Walksnail regularly releases new hardware, updating their system in response to community feedback.
- Walksnail releases innovative products like a wireless repeater system.
- Walksnail after-sale support is … typical … of Chinese companies.
- Walksnail cameras are available with excellent low-light sensitivity.
- Walksnail has a system that can record 4k video on board, but the image quality is not quite as good as DJI O4.
- Walksnail has a video transmitter that is small and light enough for use even on 65mm “Whoop” drones.
HDZero Key Facts
- HDZero is best for racing, due to its extremely low and consistent latency.
- HDZero actively participates in and supports the FPV racing community.
- HDZero resolution and image detail is better than analog, but nowhere near as good as Walksnail and DJI.
- HDZero penetration through obstacles is relatively poor. Watt-for-watt is is comparable to analog, but Analog vTX are available at higher output powers.
- HDZero video transmitters are more expensive than analog, and less expensive than DJI.
- HDZero is moderately “hackable” for increased range, since the goggles support aftermarket antennas.
- HDZero has video transmitters for small drones that are almost as lightweight as the lightest analog systems.
- All HDZero video transmitters released to date are compatible with all HDZero goggles released to date.
- HDZero is one of the most responsive companies to community feedback.
- HDzero has a USA-based warehouse.
- HDZero after-sale support is excellent.
- HDZero cameras are available with excellent low-light sensitivity.
- HDZero has no systems that record video on-board the aircraft. They are pure FPV systems, with no expectation that they will replace an HD camera like a GoPro.
The current generation of the DJI digital FPV system includes the Goggles 3, the N3 goggles, the O4 Pro video transmitter, and the O4 Lite video transmitter. This is collectively known as the “O4 generation”. The previous generation includes the Goggles 2, Goggles Integra, and the O3 video transmitter. This is known as the “O3 generation”. The O3 video transmitter is no longer made as of release of the O4. You can still find it on the used market, but expect bind-n-fly drones to transition over to the O4 completely. The Goggles 2 and Integra are still available in stores at the time of this writing. They will probably be phased out for new purchase, but will remain available used.
The G3, G2, and Integra are all compatible with the O3, O4 Pro, and O4 Lite air units. The N3 goggles are not compatible with the O3 air unit, which rules out a huge number of used drones, as well as used air units. We’re not sure how much of a disadvantage this is if you’re just getting into FPV. Buying used drones is kind of a gamble, given how rough people are on them.
There aren’t any aftermarket cameras for the O3 or O4 air units. You get the camera they come with, and that’s it. If you break the lens, you basically have to buy a new camera, which kind of stinks.
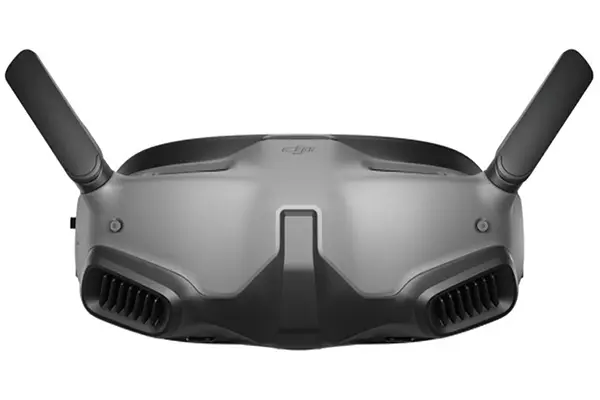
Goggles 3
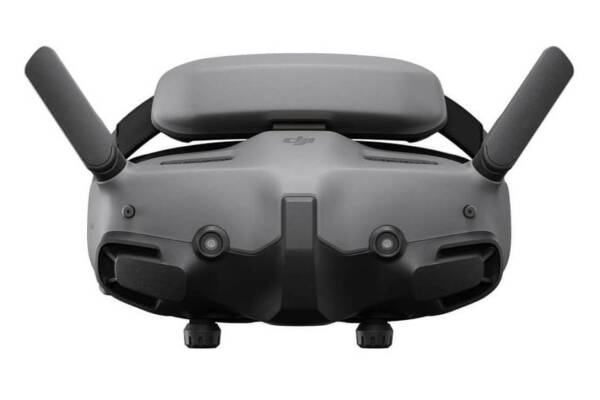
The Goggles 3 are the newest, top-of-the-line goggles for DJI’s FPV system. They’re fully compatible with the latest air unit, the O4 and O4 Lite, which means they support 60 Mbps bitrate for the most detailed and clear image; and they support the new Racing Mode that significantly lowers latency and makes the system “friendlier” to other, non-DJI pilots who you might fly with.
We could spend a lot of time listing the specs of the G3: 100Hz, 1080p OLED screens. Built in battery pack. But the short version is: they’re the latest and the best. And in the DJI ecosystem, that’s pretty much what you need to know. Our opinion is that, if you’re buying into the DJI FPV system, the G3 should be your default choice, and then you should only buy a different set of goggles if something talks you out of the G3.
The main thing that might talk you out of the G3 is its price, which could leave you looking at the N3, G2, or Integra goggles — all of which are less expensive, but also less capable in some way. The G2 and Integra are also one generation older, so they’ll reach their end of usable life sooner. DJI FPV goggles have historically been supported for about 5-6 years beofre DJI releases an air unit that the goggles aren’t compatible with, and stops relasing firmware updates. Because of this, we feel that buying into a last-generation goggle when a current-generation goggle is available is false economy.

RaceDayQuads
GetFPV
NewBeeDrone
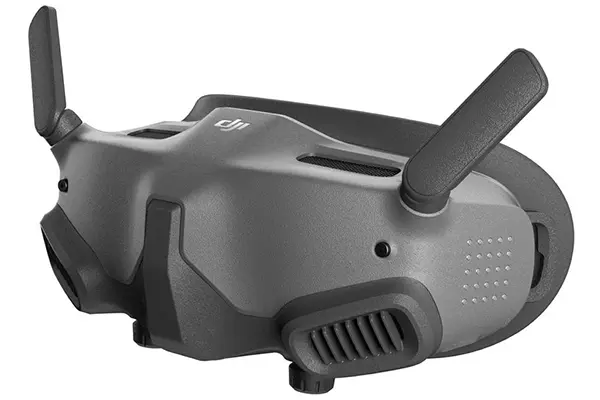
Goggles N3
The N3 might be the best “budget” DJI goggle to buy today. But it comes with some drawbacks.
The N3 is fully compatible with the O4 air units. That means it supports 60 Mbps bitrate, for cleaerer, more detailed images. And it supports Racing Mode, which gives lower latency and better compatibility when flying with other pilots who aren’t using DJI. But it’s only got a 60 Hz screen (vs. the 100 Hz screens in the G3, G2, and Integra). That means it can’t REALLY support the 100 frame-per-second modes that give the lowest possible latency and smoothest video feed. But DJI have performed some engineering trickery to mitigate this. When you use the N3 with an air unit set to 100 fps, the air unit still sends 100 fps to the goggles, and the goggles simply drop every other frame and send 50 fps to the display. This means you have about 4 ms of additional latency compared to the other goggles — not great, but not terrible either.
The other drawback of the N3 is that it doesn’t have OLED micro-displays. It’s got a single large LCD display. So the color, saturation, and contrast is not as good; the goggle is physically larger; and inside the goggle, the field of view is much larger (54 degrees for the N3 vs. 44 degrees for the G3). Although … if you’re going to go for a large FOV, it’s better to have a single big screen, since that makes it easier for the optics to keep the screen sharp from edge-to-edge. So maybe that’s a wash. And although the N3 is larger, it’s not THAT much larger than the others.
People have asked whether it’s better to buy the N3 or the Integra, since they’re often priced similarly. Although the Integra has nicer screens and is smaller, we feel the N3 might be the way to go. Even though it doesn’t have a 100 fps screen, it still has lower latency than the Integra when used in Racing mode. If you didn’t ever intend to use Racing mode, then the Integra might make more sense.
One more thing: the N3 does NOT support the O3 air unit at this time. So if you have an existing fleet of O3, the N3 is not for you. It’s just for people starting from scratch with the O4.

RaceDayQuads
GetFPV
NewBeeDrone
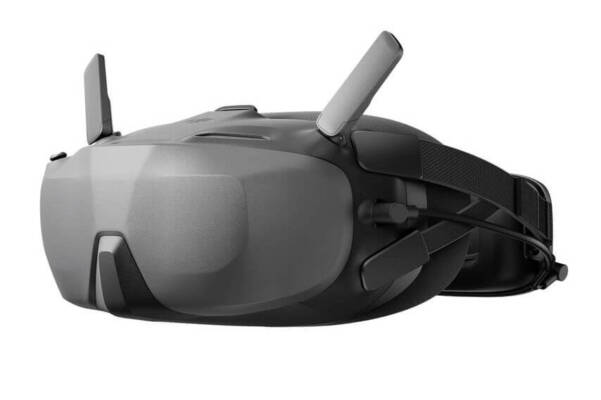
Goggles 2
The first thing you should know about the Goggles 2 is that they’re basically end-of-life since the Goggles 3 and the O4 air unit released. But you still might find them on the used market, so we wanted to include them here. And buying them on the used market wouldn’t be a terrible decision! They have the exact same 100fps 1080p OLED screen as the Goggles 3, so image quality is identical. The G2’s field of view is 51 degrees, whereas the G3 is only 44 degrees, so the screen appears larger on the G2. Some people find this more immersive, while others actually prefer the G3, since the smaller screen is in focus edge to edge, while the larger screen on the G2 is a little blurry at the edges.
The G2 is powered from an external battery while the G3 has built-in battery pack on the head strap. Personally, I love the lighter weight of the G2 on my head, and don’t mind putting a battery pack in my pocket. But you might like the G3’s totally self-contained approach better. The G2 have removable antennas, which makes it easy to swap them out for an upgrade that gives a little better range and penetraiton. The G2 have built in focus adjustment, whereas the G3 require diopter lens inserts if you have less-than-perfect vision.
If you have been using DJI since the beginning, you’ll be glad to know that the G2 is compatible with the Vista-generation air units, O3 air unit, and O4 air unit. However, you wont get the full performance of the O4 when using it with the G2. Specifically, the 60 Mbps mode and the Racing Mode won’t work with the G2. You also won’t get quite as good range with the G2 as you would with the G3.

RaceDayQuads
GetFPV
Rotor Riot
NewBeeDrone
Goggles Integra
The Integra is what you get if you take the Goggles 2 and strip out a a few things most people won’t miss, bringing the price down significantly. The optical specs of the Integra are identical to the G2: 100 Hz, 1080p, OLED screen. Like the G2, the Integra is compatible with the O3 and O4, but won’t do the O4’s Racing mode and 60 Mbps bitrate. The Integra is missing the G2’s built in focus adjustment, so if you need corrective lenses, you’ll have to buy diopter inserts. The Integra doesn’t have removable antennas. And the Integra has a built-in battery on its head strap, similar to the G3. The Integra is also missing the G2’s ability to stream to the goggles over WiFi, but you probably didn’t even know that exists, so you won’t miss it.
If you’re considering buying the G2, but you could get the Integra for $75 or $100 less, there’s a strong argument you should get the Integra instead, since the Integra is almost everything the G2 is. On the other hand, if you plan to use aftermarket antennas or if you need corrective lenses, the G2 might not seem THAT much more expensive.

RaceDayQuads
GetFPV
NewBeeDrone
O4 Air Unit Pro
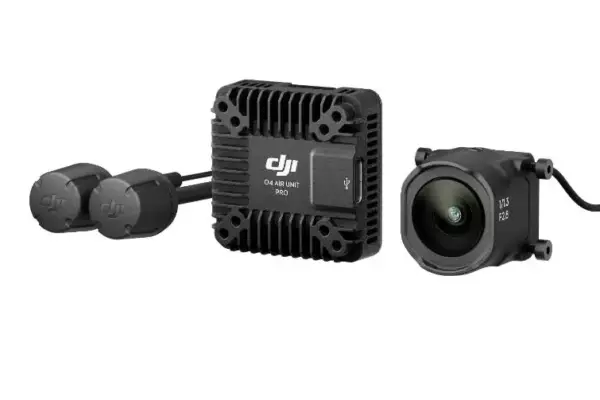
If you’re using the DJI FPV system, this is probably the air unit (video transmitter) that should go on any drone that’s large enough to carry it. The O4 has a 1/2″ sensor, which gives it great image quality and decent (but not amazing) low-light sensitivity. This is the first air unit that has been widely regarded as an acceptable replacement for a dedicated HD camera like a GoPro. The O4 Pro can record to its on-board storage at up to 4k/120fps while transmitting up to 1080p/100fps to the pilot’s goggles.
Range and penetration of the O4 are, simply put, better than any other FPV system out there. DJI just wins on this one. And not by a small margin either! By a lot! The exception would be if you are doing true Long Range (like 25+ km with aftermarket high-gain antennas, high-powered vTX, and so forth). Other systems can be pushed to longer absolute-maximum ranges with aftermarket antennas, boosted signal output, and so forth. DJI is more or less locked into its stock configuration. But even when the “other systems” get upgrades, DJI often still wins for range and penetration. It’s just that good.
The O4 generation of air units added two major features. The first is 60 Mbps bitrate, which gives clearer images with more detail, especially when moving quickly (like flying through a forest full of small branches, or over a field of grass or wheat). DJI systems have traditionally had better image quality than their competitors. The O4 only extends the lead.
The second is Racing Mode, which significantly decreases latency (at the cost of image quality) and makes the RF transmissions of the system compatible with race timing systems. Racing Mode also reduces interference with other pilots who are not using DJI FPV systems
The main down-side of the O4 air uit is price, but if you fly DJI, you already made yor peace with that. The O4 camera is very large and doesn’t fit into most frames unless they have been specifically adapted for it. Most frame manufacturers are rushing to implement O4 compatibility, but if the frame doesn’t specifically say it fits the O4, assume it won’t. The O4 also is only mediocre in low-light conditions. This is one place where DJI really doesn’t have a good answer compared to its competitors.
RaceDayQuads
GetFPV
Rotor Riot
NewBeeDrone
O4 Air Unit Lite
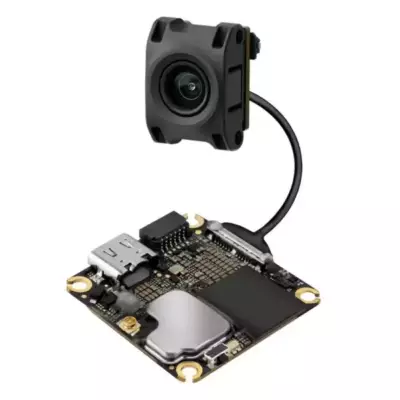
DJI’s official name for this product is the “O4 Air Unit”. That’s to differentiate it from the “Pro” version. We think that’s confusing, so we call this one the “Lite,” to make it clearer which one we’re referring to. As the name suggests, the O4 Lite is smaller and lighter than the Pro. The Lite air unit and its camera together weigh just about 10 grams, which makes them perfect for drones as small as 75mm. Of course, you can use the Lite on larger drones, but once you get to about the 3″ size class, you could (and should) use the Pro instead.
The O4 Lite achieves its small size by cutting out some of the O4 Pro’s capabilities. What’s missing? The Lite only goes up to 700 mW, while the Pro goes to 1200 mW. This means the Pro will get approximately 40% more range, all else being equal. But all else isn’t equal, because the Lite has only one antenna, while the Pro has two, so the Pro will have more stable signal over longer range and through more obstacles. The Lite doesn’t do 4k/100 or 4k/120 resolutions, but can do 4k60, 4k50, and 4k30. The Lite also supports 1080p up to 120fps, but confusingly, completely omits all 2.7k resolutions. (Remember, the goggles always see 1080p; only the on-board recording goes up to 4k.) The Pro lets you use an SD card for on-board recording, while the Lite only records to built-in memory; but it has enough memory for about 45 minutes of 4k footage.
In addition to the differences in specifications, the Lite’s camera uses a smaller sensor and worse lens than the Pro, so image quality is worse. It’s still good, but not “replace your GoPro” good. The stock lens has a disappointingly narrow field of view which makes racing and precise proximity flying difficult. (There are aftermarket lens adapters that you can 3D print or buy.)
Although the Lite is nominally rated down to 1S, it actually drops out around 3.8 volts, so it needs a step-up voltage regulator if it’s running on a 1S drone. New flight controllers are being released specifically to meet this need. If you run it off a 1S battery without a regulator, it’ll die out about halfway through the pack.
Even with these drawbacks, the O4 Lite is an amazing accomplishment. It offers the best image quality, range, and penetration of any video transmitter in this size class. Pilots who love micro drones can now finally choose the DJI FPV system without compromise!

RaceDayQuads
GetFPV
NewBeeDrone
Rotor Riot
One of the advantages of the Walksnail system is that there is a wider variety of goggles, cameras, and video transmitters for it. This leads to some confusion when you go shopping. We’ve focused this page on the current generation of products, but you will still encounter last-generation products (mostly goggles) and, unlike DJI, all Walksnail goggles ever released are still compatible with all Walksnail video transmitters ever released. So we can’t even write them off entirely as obsolete!
Another confusing thing about the Walksnail system is the number of companies involved. Walksnail is the main company. Their sister company is Caddx. They originally partnered with FatShark to make their first-generation goggles, but FatShark is a separate company and is largely separate from Walksnail today. Don’t be confused if you encounter FatShark goggles that are compatible with the Walksnail system, but know that they’re last-generation.
Goggles X
The Goggles X is Walksnail’s top-of-the-line goggle for its FPV system. Like all modern high-end digital goggles, it has dual 1080p/100fps OLED micro-displays. HDMI output makes it easy to show your video feed on an external display or capture device. HDMI input means you can use it as a computer display (great for more immersive FPV simulator flying). It also has an AV input, which means you can use it with an adapter board and an analog receiver modlue, for compatibility with quads that have an analog video transmitter. The Goggles X have +2 to -6 diopter focus adjustment built in, so most people who wear glasses will be able to get a clear image without buying aftermarket lens inserts. The Goggles X has four external antenna connectors, so you can upgrade all of its antennas for maximum range and penetration (and you should, because the stock antennas are not that great).
This is the part where we would compare the Goggles X to other goggles in the Walksnail system … except … the choices are limited. The 1st-generation Fatshark Dominator HD goggle competes favorably against the Goggles X, but it’s discontinued and last-gen, and we can’t really recommend buying it unless you get a steep discount. There’s also the Walksnail Goggles L, which compete mostly based on budget. The Goggles X beats the Goggles L in basically every way. So you should buy the Goggles X if you can afford them.
Goggles X have several features that haven’t been fully realized. They have WiFi/Bluetooth connectivity, and the phone app does exist, but is not very fully developed. They also have the ability to upgrade the radio module, to allow users to move to Walksnails next generation of FPV system without changing goggles. That’s cool in theory, but Walksnail hasn’t shown any sign of releasing that system, even though it was originally advertised for August, 2024.

RaceDayQuads
GetFPV
NewBeeDrone
Rotor Riot
Caddx
Flywoo
Goggles L
The Goggles L is one of the most cost-effective ways to get into a digital FPV system. If you’ve settled on the Walksnail FPV system but don’t want to pay big bucks for the Goggles X, the Goggles L will be your choice. The main difference between them is that the Goggles L is a “box style” goggle, where a single large screen is held in front of your face, instead of two small micro-displays with lens modules to make them look large. Box goggles tend to fit most people’s face worse than “binocular-style” goggles. I found it very difficult to position them so that I could see the screen clearly, without moving them down so low that I had uncomfortable pressure on my nose. To some degree, this can be mitigated with aftermarket face-foam on the goggles; but the issue will not be solvable for some people. The single-large-screen approach is also somewhat less immersive than the “two-micro-displays” apporoach. It feels like you’re looking at a TV in a dark room instead of having the image just sort of appear in space before your eyes. However, people with particularly wide or narrow-set eyes, and those who have trouble getting the dual micro-displays to resolve into a single image may prefer box goggles.
The screen is a 4.5″ 1080p LCD screen, so although you’ll get the same resolution as the Goggles X, you won’t get the glorious OLED color saturation, brightness, and contrast. The Goggles L only support 60 fps, which means you’ll have about 10 ms higher latency than the Goggles X’s 100 fps mode. This will be most relevant to pilots who need fast reaction time, like racers and those flying fast proximity to obstacles. Other than that, the Goggles L support all the same capabilities as the Goggles X. They have built in patch antennas, and the range compares favorably to even some aftermarket antennas for the Goggles X. However, the Goggles L don’t have any native support for aftermarket antennas, so extending range beyond the stock antennas will require surgery.
Although the Goggles L don’t have any built in focus adjustment, Walksnail sells a custom lens insert that can be made to your exact eyeglass prescription. You can also try to stuff your glasses inside the goggles, although they’ll have to be very small to fit.
If you’re trying to get into FPV on a budget, the Goggles L are a very compelling choice. They’re only about 2x the price of the cheapest analog FPV goggles, compared to 3x to 5x the price for most other digital FPV goggles. That means you can get the awesome image quality, range, and penetration of a digital FPV system with only a minor price uplift. And once upon a time, I would say that if you want digital HD FPV on a budget, the Goggles L is your only choice. But that’s not true anymore, because DJI has released the N3 goggle. It’s similar in price to the Walksnail Goggles L, and puts you in the (arguably superior?) DJI FPV system. You shoudl definitely do your research before committing.

RaceDayQuads
GetFPV
Caddx
Flywoo
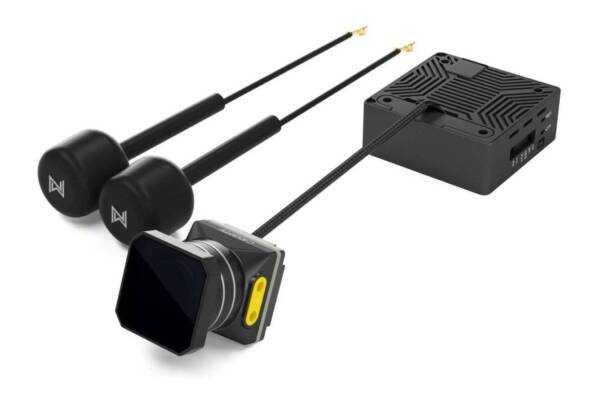
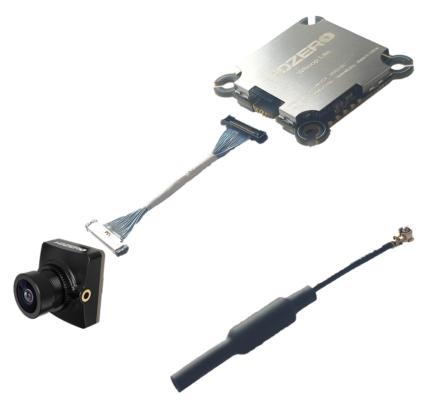
Avatar HD Pro Kit
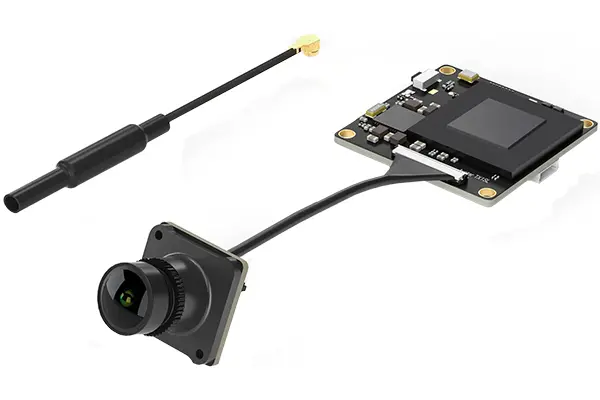
This kit combines the Avatar single-antenna vTX with the Pro camera. Here’s what that means.
The single-antenna vTX is almsot the top-of-the-line video transmitter in the Walksnail line. It has up to 1200 mW of output power and 32 GB of on-board storage for recording 1080p or 720p video. The single-antenna version will have somewhat less range and penetration than the dual-antenna version, especially in challenging environments with lots of multipath or RF interference. On the flip-side, it’s easier to mount one antenna than two!
The Pro camera is, in our opinion, the best camera for the Walksnail system — as long as you care about FPV flying and not 4k recording (the Pro camera only records in up to 1080p). What makes this camera so special is its amazing low-light performance. It’s not a true night-vision camera, but if there’s even a bright moon in the sky, you’ll be able to see where you’re going. And that’s an FPV camera’s job, right? To show you where you’re going. And the Pro camera is the best at that. The Pro camera also has a gyro built in, so you can use the free, open-source program Gyroflow to stabilize the images.

GetFPV
Caddx
NewBeeDrone
Flywoo
Avatar HD Nano Kit
The idea behind the Nano kit is that you want a video transmitter and camera that are a little bit lighter and smaller than the full size vTX, but not as small (and, let’s face it, fragile) as the 1S vTX. The Lite kit comes in around 11 grams; the Pro kit comes in around 30 grams; the Nano is closer to 20 grams.
If you look closely at the specs of the Nano kit, you’ll see they’re exactly the same as the 1S Lite kit. In fact, the Nano looks an awful lot like somebody took a 1S Lite Kit and put a metal case on the vTX. This should improve durability and heat dissipation, but otherwise the Nano and the Lite vTX should be pretty much the same. And for that reason, we kind of don’t see the point of this vTX. If you’re going to put a 20 gram Nano vTX on your drone, you can probably afford a 30 gram Pro vTX, which will come with a much superior camera, better durability, and more output power for better range and penetration. If you want a lightweight vTX, shouldn’t you just go all the way down to the Lite Kit? Just about the only person who needs the Nano is someone who wants to save 10 grams by not using the Pro, but is willing to spend 10 grams to increase durability by not using the Lite either. And we just don’t think there are very many of those people.
But if you’re one of them, more power to you!

RaceDayQuads
Caddx
Rotor Riot
NewBeeDrone
Fllywoo
Avatar GT Kit
The Avatar GT is the long-range variant of the Walksnail video transmitters. It has the same features as the other vTX, but outputs up to 2000W instead of only 1200 mW. It also has a built in fan so it doesn’t overheat when you’re not flying. As a tradeoff, it’s significantly bigger, so make sure your frame will hold it.
The Kit version of this vTX comes with the Pro camera, described elsewhere on this page. It’s my favorite camera for the Walksnail system because of its amazing low-light performance.
Should you get the GT kit? On the one hand, I’m never going to complain about more output power. The GT absolutely gets more range than the regular vTX. The big question is whether the increase in range is worth the significant increase in size and weight. If you’re building a 7″ or larger bird, then absolutely get the GT. For a 3″ to 5″ bird, the GT might be overkill.
The other thing you should keep in mind is that the GT’s 2 watt output power doesn’t mean it beats DJI video transmitters, even though DJI has lower output power. DJI’s just that good. See the comparison below for more details.

RaceDayQuads
GetFPV
Caddx
NewBeeDrone
Rotor Riot
Avatar HD Pro Kit (Dual Antenna)
This is exactly the same product as the Avatar HD Pro Kit, except the video transmitter has dual antennas instead of a single antenna. Transmitting on two antennas gives more stable and resilient signal, especially in RF environments with multipathing and/or RF interference. The dual-antenna version is only $10 more than the single-antenna version, so if you don’t mind mounting two antennas on your drone, we think the improved signal quality is worth the small uptick in price.
RaceDayQuads
GetFPV
Caddx
Avatar HD Kit (Dual Antenna)
This is exactly the same product as the Avatar HD Kit with V2 Camera, except the video transmitter has dual antennas instead of a single antenna. Transmitting on two antennas gives more stable and resilient signal, especially in RF environments with multipathing and/or RF interference. The dual-antenna version is only $10 more than the single-antenna version, so if you don’t mind mounting two antennas on your drone, we think the improved signal quality is worth the small uptick in price.
RaceDayQuads
GetFPV
Caddx
Moonlight Kit
The Moonlight is a normal Walksnail video transmitter and camera with one additional feature. Normal Walksnail vTX can record up to 1080p video on board. The Moonlight can record up to 4k. Moonlight’s camera is also optimized for producing high-quality “cinematic” footage, compared to all the other Walksnail cameras that are optimized for flying a drone via FPV. Consistent with its “cinematic” intent, Moonlight supports ND filters, has manual image settings (ISO, White Balance, Shutter Speed, and so forth), and has built in image stabilization (although it also works with GyroFlow).
Although the Moonlight is advertised as having a “starlight camera”, in our opinion it’s not particularly good at low light. It’s decent. Just nowhere near as good as a true starlight camera like the Pro camera. It’s way better than the DJI O4 though, so there’s that.
It’s easy to understand why somebody would want to ditch their GoPro and record 4k video on board the vTX. GoPros are expensive and add weight to the drone. The big question with the Moonlight is whether the quality of the image produced is good enough for your purposes. It’s nowhere near as good as a GoPro. In our opinion, it’s not as good as the DJI O4 either. But ultimately, you’ve got to watch some sample footage and reviews and decide for yourself. If you’re committed to the Walksnail system and you want to record 4k video on board, the Moonlight is your only choice.

RaceDayQuads
GetFPV
NewBeeDrone
Caddx
Flywoo
Rotor Riot
Avatar HD 1S Kit
The Walksnail 1S video transmitter is designed for ultra-small aircraft–even 65 mm Whoops can use it. It can be powered from 3.1 to 13 volts, so it’s good for 1S to 3S voltage. But be aware that it drops out HARD at 3.1 volts, so if you’re one of those pilots who sucks your 1S batteries absolutely dry, the vTX will drop out before the quad falls out of the air.
The 1S vTX supports all capabilities of the Walksnail FPV system. It can even record 1080p or 720p to its 32 GB of built in memory. But its output power maxes out at 500 mW (compared to 1200 mW for the full-size vTX) so it’ll have reduced range.
This is the “regular” version of the Walksnail 1S vTX kit. It’s about 11 grams total weight with camera, which is still a bit much for the smallest drones, like 65mm Whoops. This kit will be ok on a 75mm drone, and fantastic on anything larger, but if you want to build the lightest possible drone, or are building a 65mm drone, you should get the “lite” version.

GetFPV
RaceDayQuads
Caddx
Rotor Riot
Avatar HD Mini 1S Lite Kit
The Walksnail 1S video transmitter is designed for ultra-small aircraft–even 65 mm Whoops can use it. It can be powered from 3.1 to 13 volts, so it’s good for 1S to 3S voltage. But be aware that it drops out HARD at 3.1 volts, so if you’re one of those pilots who sucks your 1S batteries absolutely dry, the vTX will drop out before the quad falls out of the air.
The 1S vTX supports all capabilities of the Walksnail FPV system. It can even record 1080p or 720p to its 32 GB of built in memory. But its output power maxes out at 500 mW (compared to 1200 mW for the full-size vTX) so it’ll have reduced range.
This is the “lite” version of the Walksnail 1S vTX kit. It shaves about 3 grams from the weight of the “regular” 1S kit by using a smaller camera and a linear whip antenna instead of a circular polarized antenna. This results in reduced image quality and range. But cutting the weight down from about 11 grams to about 8 grams is significant when used on very small drones like 65mm Whoops that weigh 20 grams or less in total. If you’re using an even slightly larger aircraft (say, 85mm or larger), you can probably afford to choose the regular 1S kit.
The “lite” kit can be found in two versions: with and without heat sink. The no-heat-sink version saves about another 2 grams, but overheats very quickly after powerup if you don’t start flying or put a fan on it. Pay attention to which one you’re buying.
The video below links to a review of the Rotor Riot Pro Start Kit. The quadcopter in that kit includes this vTX, so you can see some flight footage to help you decide if it’s for you.

GetFPV
Caddx
Rotor Riot -
No Heat Sink
Avatar HD Kit V2
This kit combines the Avatar single-antenna vTX with the “Camera V2”. Is the naming confusing you yet?
The single-antenna vTX is almsot the top-of-the-line video transmitter in the Walksnail line. It has up to 1200 mW of output power. The single-antenna version will have somewhat less range and penetration than the dual-antenna version, especially in challenging environments with lots of multipath or RF interference. On the flip-side, it’s easier to mount one antenna than two!
This kit can be ordered with either an 8 GB or 32 GB video transmitter. That’s how much storage space the vTX has for recording on-board video. The 32 GB version also can record gyro data for stabilization with the free, open-source Gyroflow program.
The “Camera V2” is possibly the most ambiguously named product in all of FPV. The key facts are that it has ok image quality; nowhere near as good low-light performance as the Pro camera; and it’s the only native 4:3 aspect ratio camera available for the Walksnail system. Some FPV pilots like to fly with native 4:3 cameras because it gives much greater vertical field of view. If that’s you, then this is the camera to get — although I have to say that I personally prefer the Pro camera because I think its FOV is fine, and its low-light sensitivity and dynamic range are incredible.
HDZero uses a completely different method of encoding and compressing the video signal from DJI and Walksnail. The argument goes that DJI and Walksnail have higher latency, but what matters more is that the latency is always changing, so the pilot can never learn exactly how much to “lead” the quadcopter to compensate for the latency. In addition, DJI and Walksnail lose video frames when the signal gets weaker, which makes the video appear to “skip” or “stutter”. The result is a less connected feel and less precise control of the aircraft.
HDZero has very low latency–faster than DJI and Walksnail, and even faster than some analog cameras. More importantly, its latency is constant. And when the signal gets weak, the video never stutters or skips. Instead, small blocks of the image turn white, similar to the way an analog signal gets staticky.
This focus on smooth and low-latency video is why HDZero is the HD video system that racers prefer (although most of them are still on analog). In addition, HDZero was designed to be compatible with the frequencies and timing systems used by analog pilots, so it fits right in at races, and it doesn’t require any new training or procedures to avoid interfering with analog pilots at your flight line.
The tradeoff for HDZero’s approach is that it gives less range and penetration than DJI and Walksnail, watt-for-watt. And some people feel that the “sparkly static” way that the HDZero signal breaks up is less usable than the “blocky” way that DJI and Walksnail degrade. You can watch videos and try to compare for yourself, but unfortunately, it’s difficult to judge until you’ve tried to actually fly an aircraft through the environment using both systems.
HDZero has focused on making video transmitters for many different needs. There’s a 1 watt vTX for freestyle pilots and an ultra light-weight vTX and camera for tiny whoops. Although some people have managed to build smaller quads around DJI and Walksnail vTX, HDZero is the only digital FPV system that even approaches the lightweight and small size of analog.
HDZero Goggles

It shouldn’t surprise you that the HDZero goggles are the best goggle made for use with HDzero video transmitters. What might surprise you is that they’re competitive for use with Walksnail and analog video transmitters as well!
The HDZero goggles support all of HDZero’s video modes, including the ultra-low-latency 540p90 mode. They’ve got an HDMI input, so they can be connected to a laptop and used as a display for flying simulator, or any other purpose. The screens are the same 1080p, 100 Hz OLED display used in Walksnail Goggles X and DJI Goggles 2 and Goggles 3. They have an HDMI output for convenient mirroring to screen or capture card. They’ve got a built in head tracker if you use a head-tracking gimbal. A built in microphone records audio at the goggles over the DVR, so you can hear your own commentary (very useful for syncing up video if you’re a content creator.) Basically, they’ve got every feature you could ask for.
But HDZero goggles are also ideal for use with Walksnail and analog video systems! They have an external module bay that accepts Fatshark-style analog receiver modules. The HDZero goggles have a comb filter that improves the quality of the analog picture — something no other analog goggle has! Their analog DVR is one of the best on the market. It’s the only one that doesn’t skip frames when signal gets weak or goes to static, meaning the analog DVR stays perfectly in sync with real-time. As a content creator, this is massive for me, and is why I use HDZero for any video where I have to record analog DVR. You should know that the HDZero goggles sometimes glitch out when analog signal is weak or where there is a lot of intereference. For this reason, some racers and long-range pilots have abandoned them. Whether you run into these issues depends a lot on what type of envrionments you fly in.
Regarding Walksnail, the HDZero goggles can work with the Walksnail standalone receiver via the goggles’ HDMI input. The HDZero goggles can work with the Walksnail system’s 720p@100fps signal, and the latency of the HDMI input on the HDZero goggles is very low. You won’t get quite as low latency with the HDZero goggles as if you had a set of Walksnail goggles with built-in receiver, but it’s very close.
In short, the HDZero goggles are hands-down the best goggles for pilots who fly HDZero. They’re arguably the best analog goggles, with the possible exception of racers and long-range pilots. And they’re competent at Walksnail. They’re definitely the best all-round goggle for the pilot who can’t decide which video system they want.
Now if only we could figure out how to get them to work with DJI …

HDZero Store
HDZero Monitor
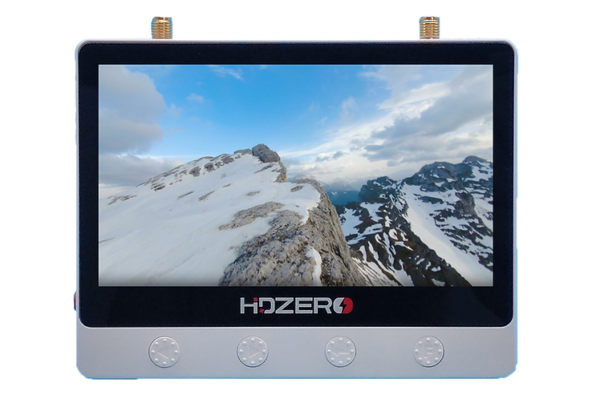
This monitor has a built in HDZero receiver and a built in analog receiver. That’s right! It can display image from any HDZero or any analog video transmitter! I only wish they’d done that with the HDZero goggles! No configuration is necessary: you just tune in to a channel and the display auto-detects the type of signal on that channel. One caveat is that it only supports the channels used by HDZero, which include R1 through R8, F2, and F4. These are the channels most commonly used by analog pilots, but if for some reason you use a different channel, the HDZero monitor won’t tune it in.
The screen is 720p at 60 fps, so it’s not fully compatible with HDZero’s 540p@90fps display mode. The monitor will show the 90fps feed, but it will drop 1/3 of the frames to bring the framerate down to 60 fps. As a result, the image will be a little bit jittery and HDZero’s official advice is to only use it for spectating 90fps signals, not for flying them.
The HDZero monitor has built in DVR and can record both HDZero and analog signals. It doesn’t have a built in microphone like the HDzero goggles do, though. It supports an AV input via 3.5mm plug if you want to use it with an external analog receiver. It has HDMI output to allow you to send signal to a larger display, but no HDMI input.
The big question is, should you use the HDZero screen as your primary FPV display device. And we think the answer to that is no. Goggles on your face offer a much more immersive experience. The screen is quite small, so you won’t be able to see as many details unless you’ve got it close to your face anyway. And if you’re in a bright environment, even the 800 nits display will get washed out. We think the main purpose of this screen is people who want a fantastic monitor for spectating other pilots and for working with drones on the bench. In these cases, it can be annoying to have to put goggles on your face, and having a monitor you can glance at or pass around is a relief.
HDZero Store
GetFPV
RaceDayQuads
NewBeeDrone
HDZero Freestyle v2 kit
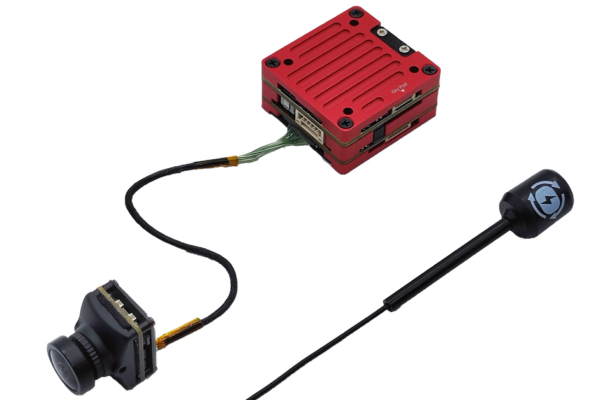
The Freestyle is the no-compromises, top-of-the-line video transmitter for the HDZero system. It has the same capabilities as any other HDZero vTX. What makes it stand out is its 1W of output power — the highest of any HDZero vTX. To achieve this power, it’s got a separate radio amplifer board, and that makes it bigger and heavier than any other HDZero vTX too. But don’t get it wrong! It’s comparable in size and weight to any other digital vTX from Walksnail or DJI. The only reason it stands out is that most other HDzero vTX are significantly smaller and lighter.
The Freestyle vTX works with any HDZero camera with a MIPI connector. We strongly recommend the Nano 90 camera (which is the one in this kit) because it supports the 540p@90fps mode that gives ultra-low 4 ms latency. This is the one thing that most sets HDZero apart from other digital FPV systems, and if you run HDZero, it seems a shame to not have it available. Even if you’re using the “regular” 720p@60fps mode, the Nano 90 camer has excellent image quality and great low light sensitivity. It’s just a fantastic all-round camera.

HDZero Store
GetFPV
RaceDayQuads
NewBeeDrone
HDZero Race v3 vTX
This is the video transmitter that HDZero pilots should buy for racing drones. It’s thin and light enough to easily fit on a 3″ or 5″ racing drone. And it’s optimized to be as durable as possible (chonky 1.6mm PCB), because everybody knows racers crash a lot. Most importantly, it works with the Nano 90 camera, which supports HDZero’s 540p@90fps mode, for ultra-low 4 ms latency. And that’s basically THE reason why racers choose HDZero. Because it gives way bettter image quality than analog with no latency penalty like DJI or Walksnail.
The Race v3 vTX takes 1S to 3S input voltage. It outputs 25 mW or 200 mW. Racers typically run at 25 mW so this isn’t an issue, but this woudn’t be a good vTX for general cruising, freestyle, or fun-flying, if you could possibly fit the Freestyle vTX with its 1W output power.
Strangely, the HDZero Race vTX is the only HDZero vTX that isn’t sold in a vTX+camera kit. So you’ll need to buy the camera separately. And let me be clear: it should be the Nano 90 camera! (Although this vTX will work with any HDZero camera with a MIPI interface.)

HDZero Store
GetFPV
RaceDayQuads
NewBeeDrone
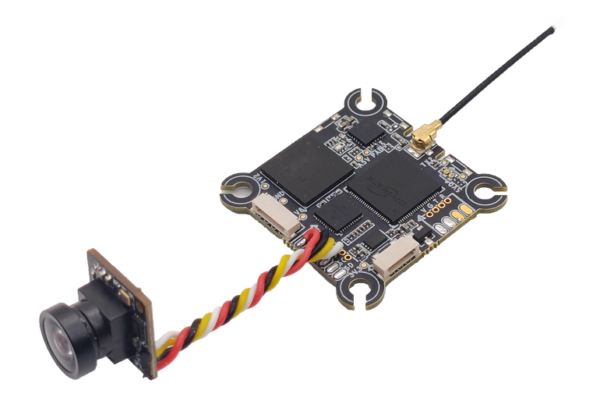
HDZero Whoop Lite Bundle
The Whoop Lite bundle is a lightweight video transmitter and cameras for ultra-small drones like 65mm Whoops. It’s slightly heavier than the HDZero Eco system, but the Whoop Lite uses a digital camera with MIPI cable, so it has noticeably better image detail. (Both systems transmit the same 720p feed to the goggles, but the camera’s ability to resolve details is dfiferent.) Compared to the Eco system, the Whoop Lite’s camera is significantly bigger, especially on 65mm and 75mm drones. Above that size, the drones are generally big enough to handle larger cameras without issue.
If you’re shopping for a lightweight HDZero vTX for your micro drone, you should compare the video linked below to my review of the HDZero Eco to see if the difference in image quality is worth the increased weight. We’d say that, for a 65mm drone, the Eco is the way to go, because they need all the help they can get. For a 75mm or larger, the Whoop Lite might make more sense (although the Eco is still going to be more durable).

HDZero Store
RaceDayQuads
GetFPV
NewBeeDrone
HDZero Eco Bundle
The HDZero Eco is a low-cost, lightweight, and durable HDZero video transmitter and camera. Other HDZero cameras output a digital signal over a fragile and expensive MIPI cable. The Eco camera outputs an HD analog signal over a regular wire, just like an analog camera. This means that the camera is exceptionally small and light, and the cable is way more robust than the MIPI cable, which is usually a weak spot, especially on very small Whoop drones, which don’t give much protection.
A couple points. 1) Yes, this is still an HD signal, even though it’s analog. Standards for HD analog were created for security cameras years ago. They were never broadcast over the air, and have been largely replaced by digital signals today, so few people have heard of them. But they do exist! 2) No, you cannot take a regular analog FPV camera and connect it to this vTX. Although the vTX does take an analog signal in, it’s not the same standard-definition CVBS signal used by regular analog cameras, and it won’t work.
The vTX takes 1S-3S voltage input and outputs 25 mW and 200 mW. The camera and vTX together weigh about 7-8 grams.
The image quality of the Eco camera and vTX is not as good as the HDZero MIPI systems. But check out review videos and see if it’s good enough for you, because the lower cost, lighter weight, and increased durability are all very desirable.
